class: center, middle, inverse, title-slide # Fundamentals of RMarkdown --- layout: true <div class="dk-footer"> <span> <a href="https://rfortherestofus.com/" target="_blank">R for the Rest of Us </a> </span> </div> --- # RMarkdown Overview -- Every RMarkdown document has the following: -- 1. **YAML** (one per document) -- 2. **Text** (repeated as many times as necessary) -- 3. **Code chunks** (repeated as many times as necessary) --- ## RMarkdown Overview  --- class:inverse ## Your Turn 1. Create a new project. Don’t worry too much about what’s it called, etc because we’ll only use this for a bit to demonstrate how RMarkdown works. 1. Create a new RMarkdown file, setting the default output format as Word. 1. Save your RMarkdown file as report.Rmd. 1. Look through this RMarkdown file and make sure that you can identify the YAML, text sections, and code chunks. 1. Click the Knit button and open the file that gets produced (report.docx). --- # YAML  --- # YAML Stands for "YAML Ain't Markup Language" (don't worry about it). -- Often referred to as "RMarkdown front matter." -- It is metadata that tells RMarkdown things like title, author, date, output options, etc. -- ```r --- title: "My Super Fancy Report" author: "David Keyes" output: html_document --- ``` --- class: inverse ## Your Turn 1. Go into the YAML and change the title to “My Super Fancy Report.” 1. Remove the line with the date from the YAML. 1. Change the output format to HTML by changing `output: word_document` to `output: html_document`. 1. Knit again and open report.html to make sure your changes show up. --- # Text  --- ##Text .pull-left[ With Markdown text, you write everything as pure text (no clicking a B button to make things bold). ] .pull-right[  ] --- class: middle 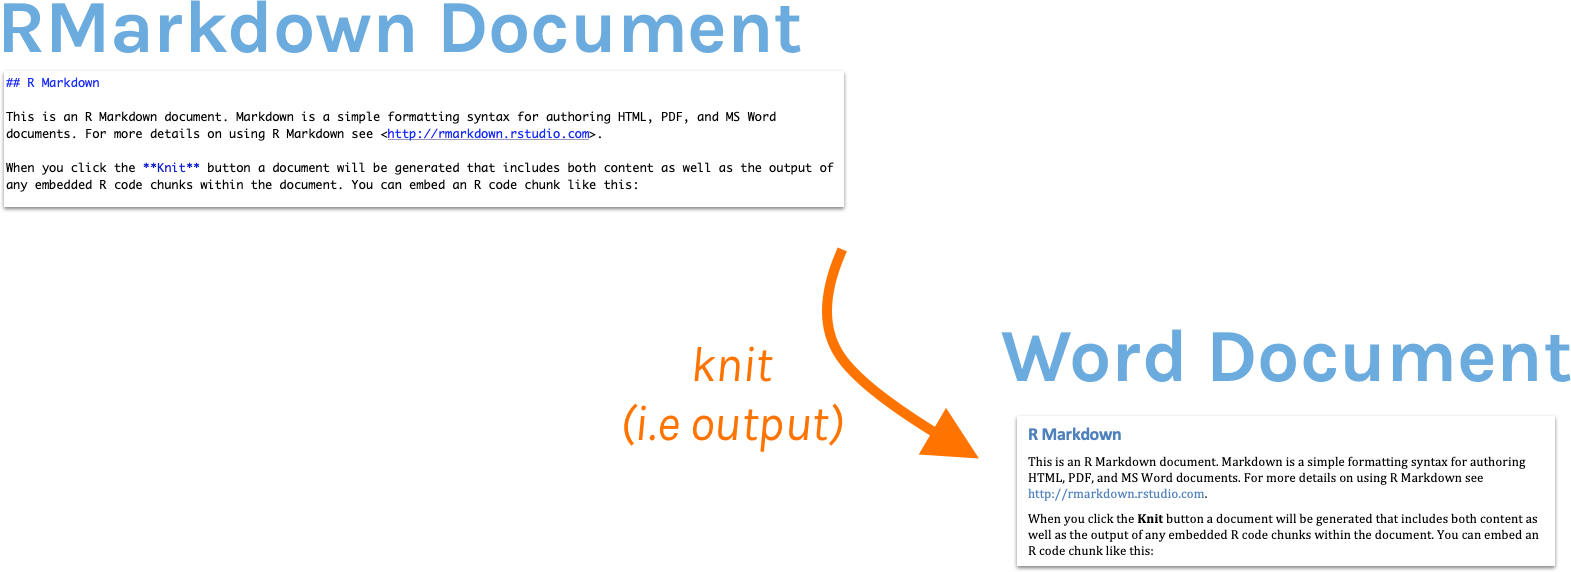 --- ## Text .pull-left[ **Markdown** ``` Text with **some words in bold** and *some words in italics* ``` ] -- .pull-right[ **Output** Text with **some words in bold** and *some words in italics* ] --- ## Headers .pull-left[ **Markdown** ``` # First-Level Header ## Second-Level Header ### Third-Level Subheader ``` ] -- .pull-right[ **Output** # First-Level Header ## Second-Level Header ### Third-Level Subheader ] --- ## Lists .pull-left[ **Markdown** ``` - Bulleted list item #1 - Bulleted list item #2 1. Numbered list item #1 1. Numbered list item #2 ``` ] -- .pull-right[ **Output** - Bulleted list item #1 - Bulleted list item #2 1. Numbered list item #1 1. Numbered list item #2 ] --- class: inverse ## Your Turn 1. Working in your report.Rmd file, above the RMarkdown second-level header, add the following first-level header: "Introduction" 1. Add this text (note the bold and italics) below the introduction header: "This report is the best report ever. Pretty much the **bees' knees**. Can't say that I've *ever* seen a better report." 1. Add the following second-level header: "Reasons Why This Report is the Best" 1. Add the following list of reasons why the report is the best: - It's amazing - It's quite amazing - It's seriously amazing 1. Knit again and reopen the report.html file to make sure your changes show up. --- # Code Chunks  --- ## Code Chunks They start with three backticks and {r} and end with three backticks. .dk-smaller[ 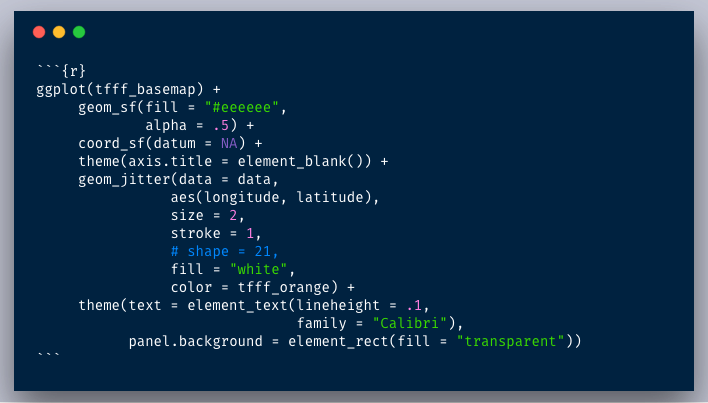 ] --- ## Code Chunks .pull-left[ **Code Chunk**  ] -- .pull-right[ **Output** 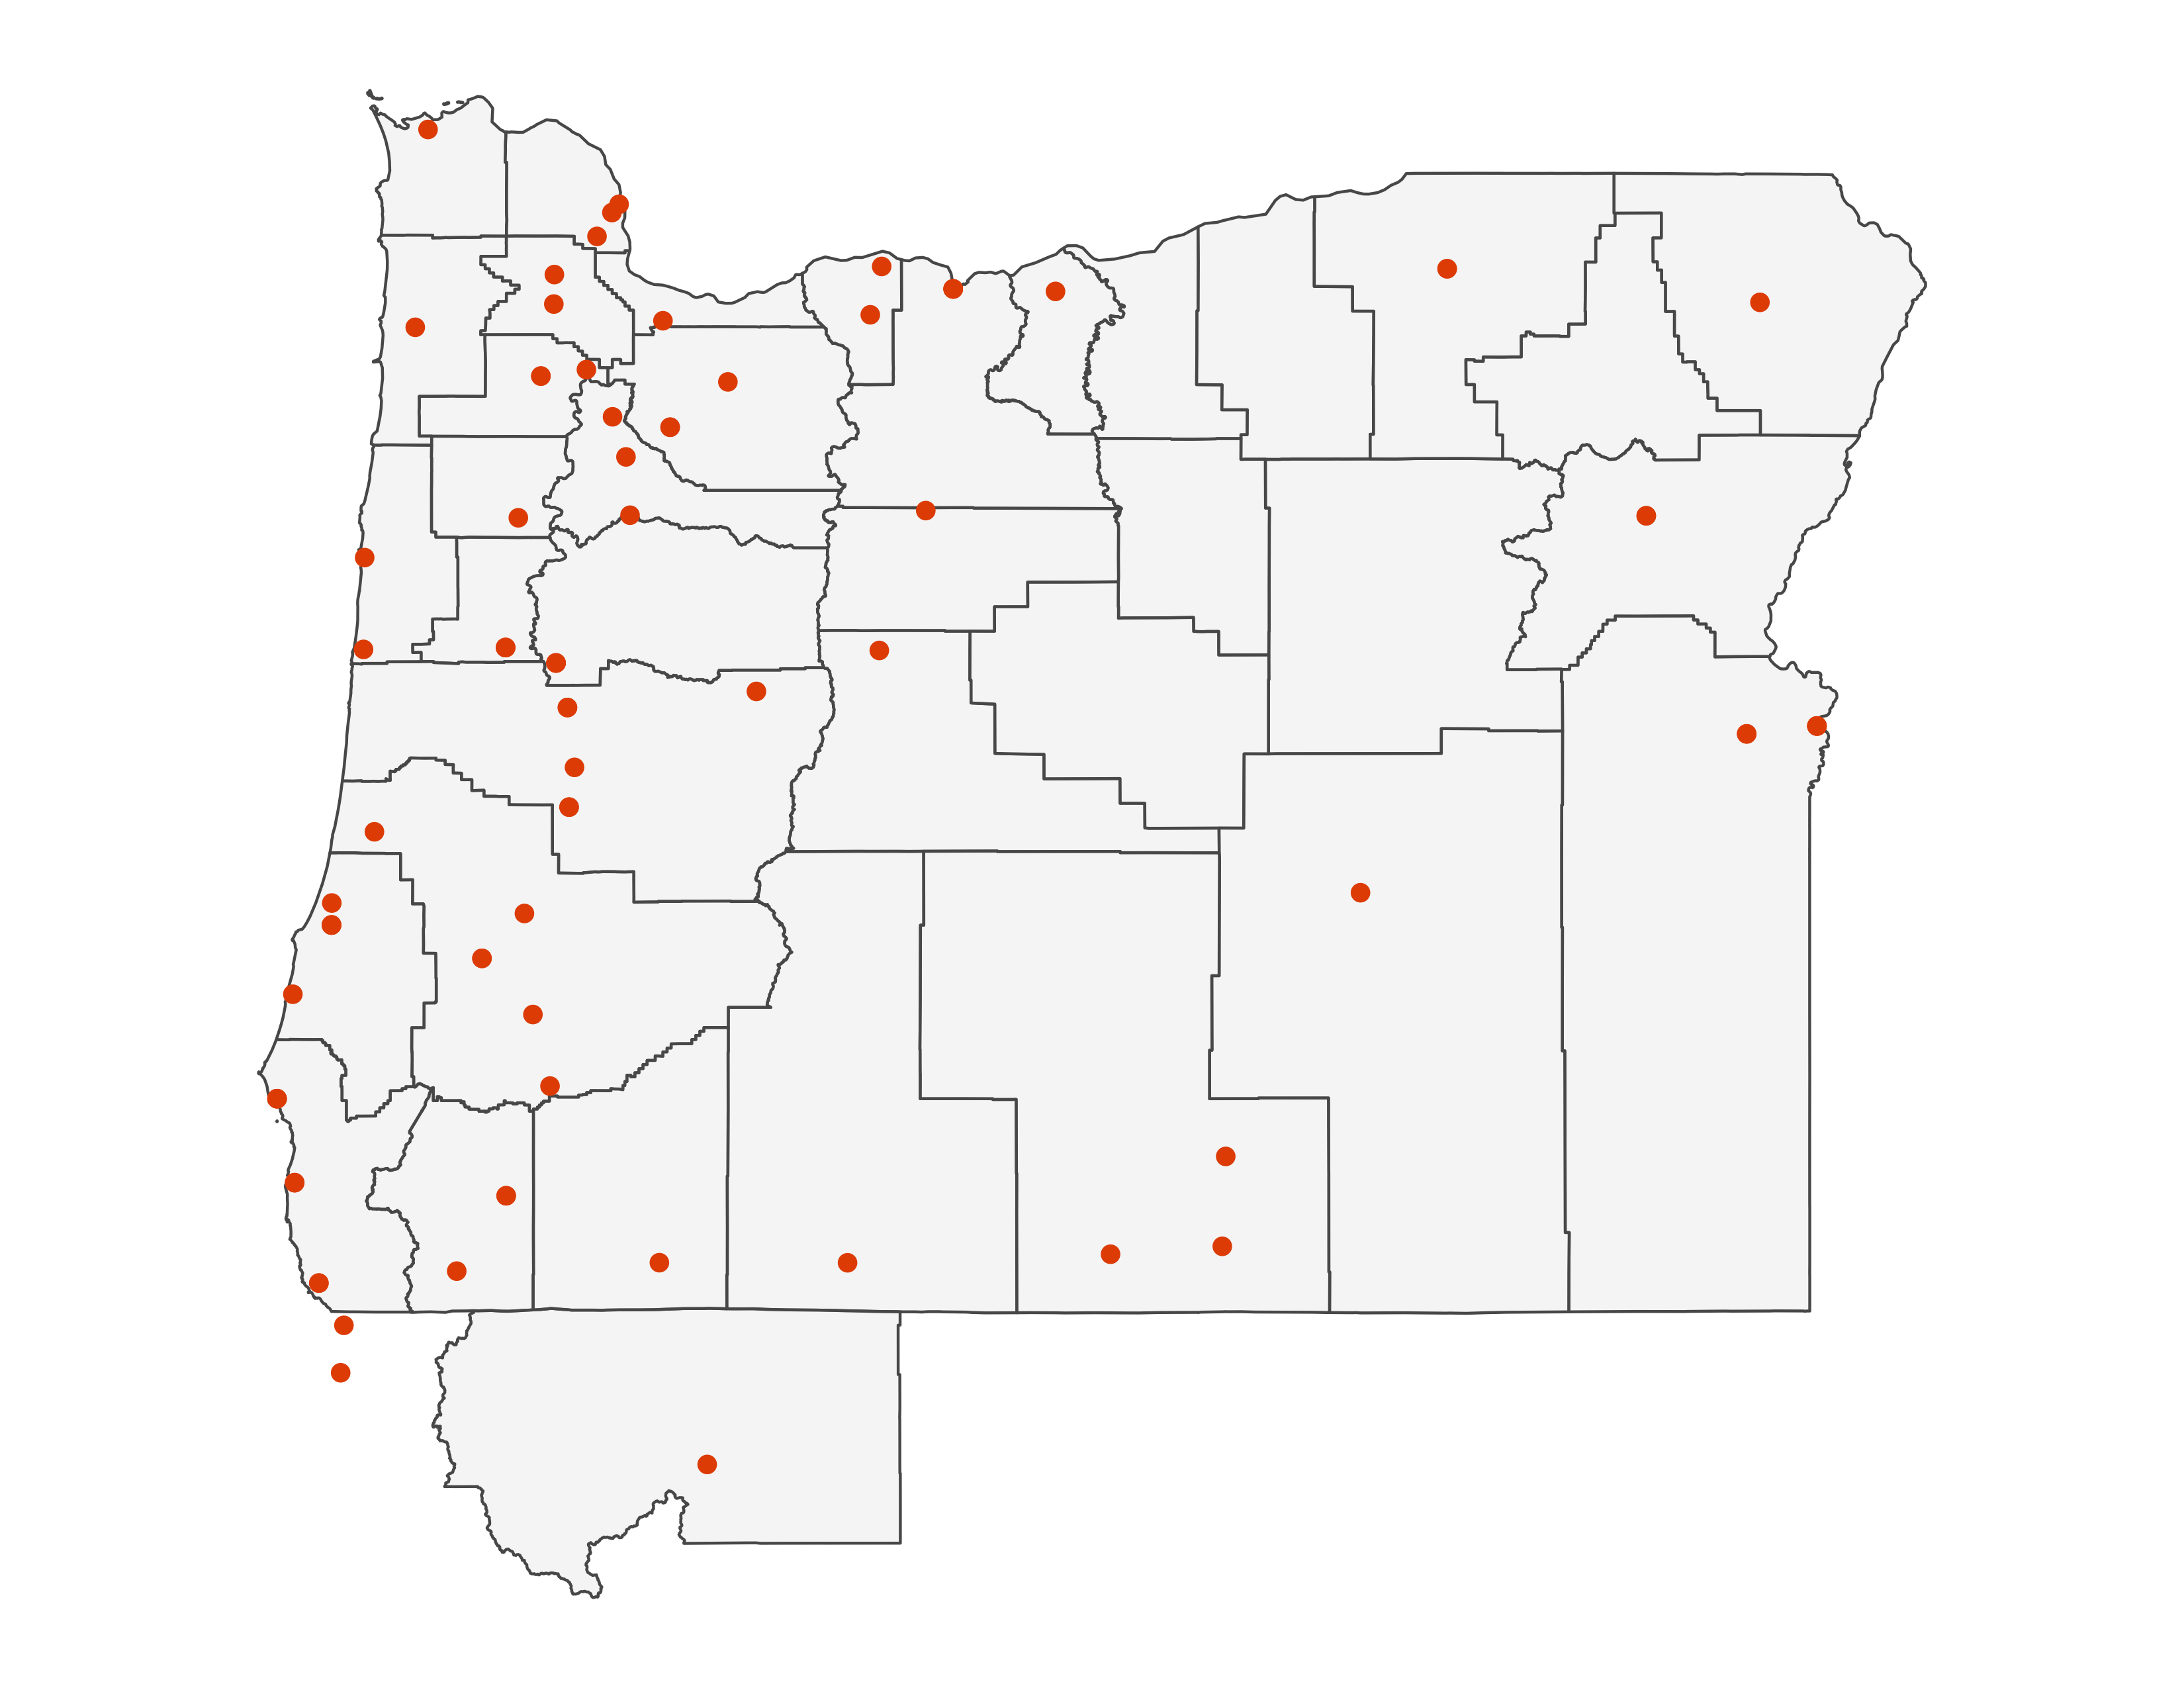 ] --- ## Insert a Code Chunk: Button 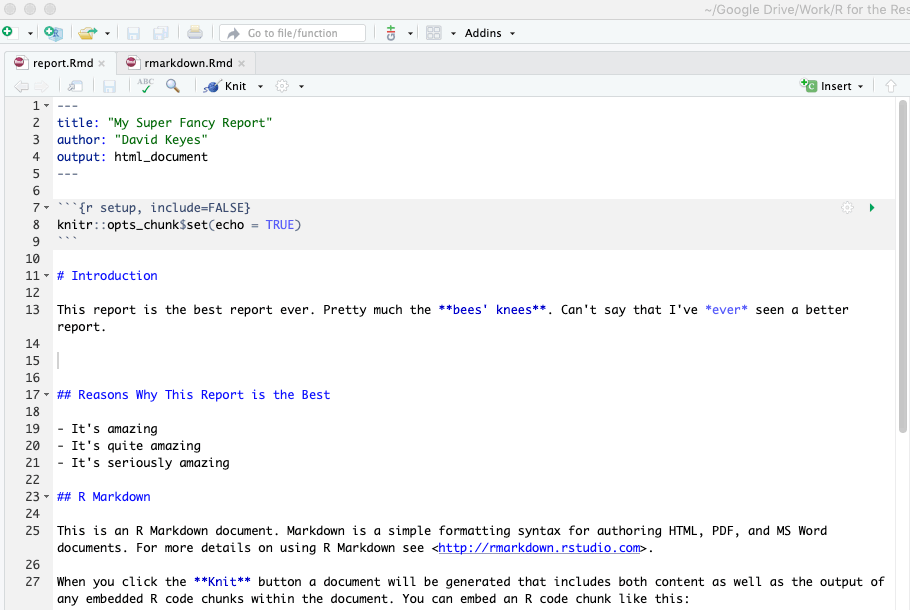 --- ## Insert a Code Chunk: Keyboard Shortcut .pull-left[  **Mac** *command+option+I* ] .pull-right[  **Windows** *control+alt+I* ] --- ## Code Chunk Names You can (but don't have to) give code chunks names. -- .pull-left[ 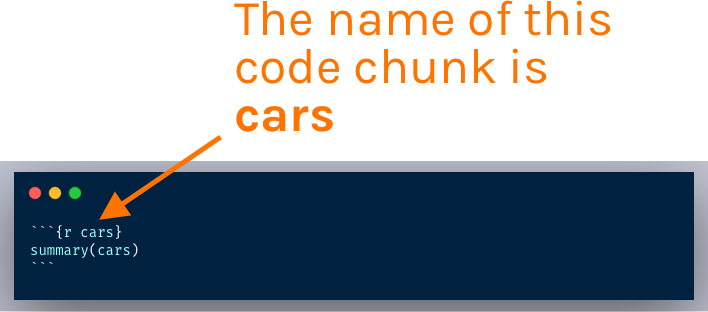 ] -- .pull-right[ 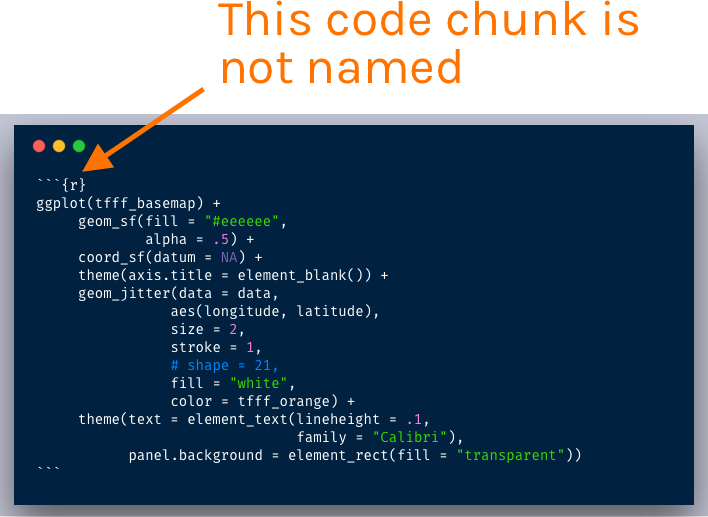 ] --- ## Chunk Options: `echo` -- Do you want to show (i.e. **echo**) the R code in the knitted report? 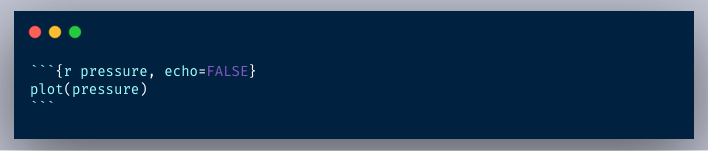 --- ## Chunk Options: `include` Do you want to **include the output** (i.e. the graph or table) that the code produces? 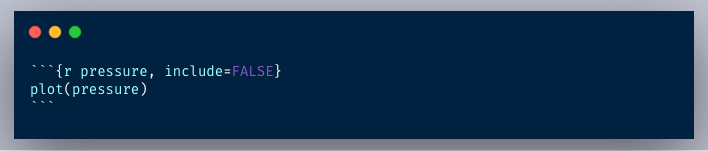 --- ## More Chunk Options **Other options** that we won't discuss in this course: - **`warning`** (show any warnings that R throws) - **`message`** (show any messages that R sends) - **`fig.width`** (default figure width) - **`fig.height`** (default figure height) - and many more ... --- ## Setup Code Chunk -- A special code chunk with the text `setup` right after the `r`. 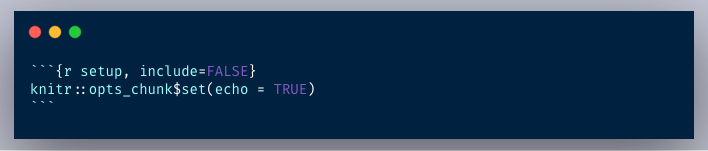 -- All chunk options can be set at the **global level** (in the setup code chunk) or at the **chunk level** (for individual chunks). -- Options at the individual chunk level **override** global chunk options. --- class: inverse ## Your Turn 1. Change the default chunk options in the setup code chunk so that `echo = FALSE`. Knit your report and notice what is different. 1. Change the chunk options in the cars code chunk so that `include = FALSE`. Knit your report and notice what is different. 1. Add a new code chunk (don't worry about naming it). In it, load the package `skimr` (hint: use the `library` function). Then, use the `skim` function that you learned about in the Getting Started course to skim the `cars` data frame. Knit your report to see the output. --- class: inverse, middle, center # What Else Can You Do with RMarkdown?